[b]fan motor, umaandar sa una, mayamaya ay namamatay[/b]
Ito ay dahil leaky na ang capacitor, palitan ng bagong capacitor.
Saturday, March 5, 2011
Sunday, February 27, 2011
Electronic
www.petervaldivia.com/technology/electricity/resistance-and-ohm-law.php
http://www.clear.rice.edu/elec201/Book/basic_elec.html
http://www.electronicsteacher.com/tutorial/
http://alignment.hep.brandeis.edu/Lab/Tutorial.html
http://informe.com/electronics/electronics_tutorial/
http://www.kpsec.freeuk.com/symbol.htm
http://www.allaboutcircuits.com/vol_1/chpt_1/7.html
http://www.electronicsandyou.com/electronics-basics/diode.html
http://www.kpsec.freeuk.com/components/diode.htm
http://www.rapidtables.com/electric/electrical_symbols.htm
http://www.rapidtables.com/electric/electrical_symbols.htm
http://www.opamp-electronics.com/tutorials/dc_theory.htm
http://www.ikalogic.com/beg_1_res_v_c.php
http://www.ikalogic.com/beg_1_res_v_c.php
http://www.ikalogic.com/beg_1_res_v_c.php
http://www.hobbyprojects.com/tutorial.html
http://www.hobbyprojects.com/tutorial.html
http://www.khazar.com/academics/portal/ucsc/2010fall/danm219/meeting02.php
http://www.hobbyprojects.com/schematics_circuits_symbols.html
http://paulgorman.org/misc/electronics/
http://www.electronics-tutorials.ws/dccircuits/dcp_1.html
http://www.best-microcontroller-projects.com/schematic-symbols.html
http://www.kpsec.freeuk.com/components/tran.htm
http://www.electronics-tutorials.ws/capacitor/cap_2.html
http://www.technologystudent.com/images5/sw5.gif
Tuesday, February 22, 2011
Magpastart ng genset ngrekta, walang ignition switch Itong starter, ay pagshortedin
[b]Magpastart ng genset ng rekta, walang ignition switch[/b]
[list][url=http://www.imagehosting.com/][img]http://piczasso.com/i/pw1zl.jpg[/img][/url]
Itong starter, ay pagshortedin ang dalawang linya na ito, gumamit ng wire para magshorted at umandar ang genset.[/list]
[list][url=http://www.imagehosting.com/][img]http://piczasso.com/i/pw1zl.jpg[/img][/url]
Itong starter, ay pagshortedin ang dalawang linya na ito, gumamit ng wire para magshorted at umandar ang genset.[/list]
Umaandar ang aircon sa simula, after 1 hour patay. Aandar ul
Umaandar sa unang buhay ang
aircon. Tapos mamatay.
[color=red] posible cause[/color]
Maaring madumi na ang aircon. Kelangang linisin
(nilinisan na ang aircon, ganun pa din)
Dahil may leak back na ang
compressor. Kapag pinatay mo
ang compressor. Hipuin ito sa
suction line ang normal ay
malamig ito. Kung paghipo ay
mainit, may leak back ang compressor.
Nag trip ang breaker ngwindow a/c
Nag trip ang breaker ng
window type aircon
[color=red] warning:[/color]
Huwag nyong buhayin agad
ang a/c, maaring shorted na
ang compressor nito kaya nag
trip ang breaker. Sasabog ang
terminal ng compressor at
mabubutas, tatalsik ang freon at langis, magkakalat pa kayo.
Siguraduhing i check ang
compressor.
[color=red]ganito ang dapat gawin.[/color]
Namatay ang aircon, naka on naman ito, walang supply sa saksakan.
Then na check nyo ang breaker nya ay nag trip.
Huwag itaas or ibalik ang breaker. Bunutin ang saksakan ng a/c. I check nang mabuti ang ac, maaring sumabog ang aircon., alamin muna ang dahilan kung bakit nag trip ang breaker. Bago sya ibalik sa dati.
Monday, February 21, 2011
Electronic Symbols
Electronic Symbol
antenna [url=http://img3.imagehyper.com/img.php?id=580949&c=fe2981f1093b267fb3701fbc02c224ce][img]http://img3.imagehyper.com/t/0/0/580/580949-bc2cdb50.gif[/img][/url]
Antenna Coil [url=http://img3.imagehyper.com/img.php?id=581562&c=f98deae3ab52202a673d8276efc4e899][img]http://img3.imagehyper.com/t/0/0/581/581562-3870f46b.jpg[/img][/url]
I.F. (intermidiate frequency) transformer [url=http://img3.imagehyper.com/img.php?id=581655&c=3351c92403eafd4f21662bcfe9ed4488][img]http://img3.imagehyper.com/t/0/0/581/581655-f47bad72.jpg[/img][/url]
Ang I.F. transformer ay makikita nyo sa radyo na may kulay puti, yellow at black.
[url=http://img3.imagehyper.com/img.php?id=595953&c=6d278b468ce26c3b11a9c2fbea9c747f][img]http://img3.imagehyper.com/t/0/0/595/595953-43e2e8da.jpg[/img][/url]kung makikita nyo ang signal ay lumabas na nakuha sa air, or radio station. Ang ginagawa ng if transformer ,tingnan sa picture. Ay pinapaganda nya ang tunog, mula sa 99% clear papunta sa 100% clear, papunta sa speaker at maririnig na natin.
Oscillator
Coil [url=http://img3.imagehyper.com/img.php?id=581658&c=dd92fa9135a444592f31bbc3827b0b24][img]http://img3.imagehyper.com/t/0/0/581/581658-cc929b18.jpg[/img][/url]ang kulay nya ay red.
[url=http://img3.imagehyper.com/img.php?id=595976&c=cd78da80d842540046b2758ed4af0c24][img]http://img3.imagehyper.com/t/0/0/595/595976-e086d803.jpg[/img][/url]
Interstage transformer [url=http://img3.imagehyper.com/img.php?id=581662&c=263454fc4eb825fb2412f2073945e812][img]http://img3.imagehyper.com/t/0/0/581/581662-8c499f61.jpg[/img][/url]
Output transformer [url=http://img3.imagehyper.com/img.php?id=581545&c=80fd30e7e90900614218afe814d66d02][img]http://img3.imagehyper.com/t/0/0/581/581545-2aee7fb0.gif[/img][/url] [url=http://img3.imagehyper.com/img.php?id=581557&c=6e32e0557dbddc6ecf6d5d9f4fbfb11f][img]http://img3.imagehyper.com/t/0/0/581/581557-7f4b80bc.gif[/img][/url]
Resistor [url=http://img3.imagehyper.com/img.php?id=582165&c=6717b00e21e6c0cb0db7a7c8a3111791][img]http://img3.imagehyper.com/t/0/0/582/582165-e2fb57b0.jpg[/img][/url] [url=http://img3.imagehyper.com/img.php?id=582065&c=d55eb1f82749c9e3afe606cad11e9b2e][img]http://img3.imagehyper.com/t/0/0/582/582065-f5ad1850.jpg[/img][/url]
Thermistor [url=http://img3.imagehyper.com/img.php?id=582091&c=15984c340d1b40d46b3997339eef74c6][img]http://img3.imagehyper.com/t/0/0/582/582091-ce0d1229.jpg[/img][/url]
Volume control [url=http://img3.imagehyper.com/img.php?id=582093&c=fe9ed3359eca3b7823a21e4ae599aa13][img]http://img3.imagehyper.com/t/0/0/582/582093-c39fd829.jpg[/img][/url]
Capacitor [url=http://img3.imagehyper.com/img.php?id=582112&c=89d6ecb1d59bb3b2f486eea426a272e4][img]http://img3.imagehyper.com/t/0/0/582/582112-5592208d.jpg[/img][/url][url=http://img3.imagehyper.com/img.php?id=582117&c=56b7b16d53bf7e352286d63b0c88b009][img]http://img3.imagehyper.com/t/0/0/582/582117-a62e4f34.jpg[/img][/url]
Valuable capacitor [url=http://img3.imagehyper.com/img.php?id=582123&c=29463a768c2c1cc18c1c0621dcdadff5][img]http://img3.imagehyper.com/t/0/0/582/582123-5506e798.jpg[/img][/url]
Diode [url=http://img3.imagehyper.com/img.php?id=582127&c=9b5e0550252296336b1d59eb21588d00][img]http://img3.imagehyper.com/t/0/0/582/582127-460f37c2.jpg[/img][/url]
Battery [url=http://img3.imagehyper.com/img.php?id=582129&c=da09d66d6b39c8be26e56c0c8d389173][img]http://img3.imagehyper.com/t/0/0/582/582129-368d4e31.jpg[/img][/url]
Ground
Speaker [url=http://img3.imagehyper.com/img.php?id=582196&c=800ebeae3f372d13c3b9717dcd297fda][img]http://img3.imagehyper.com/t/0/0/582/582196-9a27c66f.jpg[/img][/url]
Wire connected [url=http://img3.imagehyper.com/img.php?id=582207&c=72a99ed23f69c78f053413af0a19ec76][img]http://img3.imagehyper.com/t/0/0/582/582207-fbf5ca3c.gif[/img][/url]
Wire not connected [url=http://img3.imagehyper.com/img.php?id=582216&c=ddd0949c431db61b2a9d1c4d3d2f9368][img]http://img3.imagehyper.com/t/0/0/582/582216-0c35ce22.gif[/img][/url]
Transistor [url=http://img3.imagehyper.com/img.php?id=582225&c=5080dd20ba5dc16edf45fca2b19faede][img]http://img3.imagehyper.com/t/0/0/582/582225-7cb3fc70.jpg[/img][/url][url=http://img3.imagehyper.com/img.php?id=582236&c=05b701d96d36a0f6f855e31c896451d5][img]http://img3.imagehyper.com/t/0/0/582/582236-cc901774.gif[/img][/url]
[url=http://img3.imagehyper.com/img.php?id=582242&c=c30e2918b845e3f5b99002f7bb280d5a][img]http://img3.imagehyper.com/t/0/0/582/582242-3ba0af0d.gif[/img][/url]
Two kinds of transistor
1. NPN
2. PNP
[url=http://img3.imagehyper.com/img.php?id=582277&c=ac09a0895bbc72e19a48ada110247315][img]http://img3.imagehyper.com/t/0/0/582/582277-c014d364.jpg[/img][/url][url=http://img3.imagehyper.com/img.php?id=582280&c=489c1695f3d4e046a0e538d26ddba90e][img]http://img3.imagehyper.com/t/0/0/582/582280-dc26c75e.gif[/img][/url][url=http://img3.imagehyper.com/img.php?id=582301&c=46c8cdb245312dbaad903823a761247f][img]http://img3.imagehyper.com/t/0/0/582/582301-7a843547.gif[/img][/url][url=http://img3.imagehyper.com/img.php?id=582317&c=4cb62fac41f19e6e7ff1bb8ccb73c84d][img]http://img3.imagehyper.com/t/0/0/582/582317-b0359ed3.gif[/img][/url]
Monday, January 17, 2011
Fan motor for 1.5 hp or 1 ton aircön
0.68a 76w
Part. No. Ysk65-bj
Ccac part no. Ac361042
Rpm. 950/850 /750
Cap 3uf/440v
By Conception Carrier
Part. No. Ysk65-bj
Ccac part no. Ac361042
Rpm. 950/850 /750
Cap 3uf/440v
By Conception Carrier
Central air conditioner compressors
What are air conditioner
compressors?
Air conditioning compressor is
the heart of the air conditioner
units. It’s the mechanical
components that use electricity
and capacitor as the single
energy source to operate it.
The air conditioning compressor
is the ac parts that cause the air
conditioner refrigerant to flows
in a cycle.
What are the types of air
conditioning compressors?
There are five main types of air
conditioner compressors:
1. Reciprocating
2. Rotary compressor
3. Centrifugal compressor
4. screw compressors
5. Scroll compressors
All five groups of air conditioner
compressors work the same
way, but their internal methods
of compressing refrigerant
vapors are different.
The most common compressor is
the reciprocating compressor. It
comes into two domes or
housing:
1. Open compressors
2. Hermetic compressors
Hermetic compressor is the most
common air conditioner
compressors found in residential
AC units and light commercial
units. So, the only compressor I’ll
being focusing here is hermetic
compressors.
Hermetic compressor comes into
two types:
1. Sealed or welded hermetic
compressors
2. Semi-hermetic (this compressor
has nuts and bolts holding it
together.)
Sealed hermetic compressors
Welded hermetic compressors
aka tin can or sealed hermetic
are throwaway compressors.
There is no way of get inside the
compressor, unless it ’s cut open.
There’re few companies that
open this compressor, they are
specialize this kind of works. Air
conditioner compressors
manufacture opens the sealed
hermetic compressors to
examine it. Otherwise, its a
throwaway.
In sealed hermetic compressors
the motor and crankshaft are in
vertical position. It used the
suction refrigeration from the air
conditioner evaporator to cool
the internal compressor at an
operating temperature.
The air conditioner compressors
have a safety device inside to
protect the compressor from
heating. This device is internal
overload. The air conditioning
compressor is the most
expensive AC parts in condenser
units; it ’s wise to protect the
compressor.
In a hermetic compressors
there ’re two important tubes
that welded with the hermetic
shell. These two tubes are:
1. Suction line
2. Discharge line
The suction line is the larger line
connecting to the indoor air
conditioner evaporator. The air
conditioner compressors pull the
refrigerant through the suction
line and releases it to the air
conditioner condenser through
the discharge line.
In split-central air conditioner
units, the suction is always
insulating to prevent the cool
refrigerant from absorbing
outside heat.
Semi-hermetic compressors
This is the air conditioning
compressors that have nuts and
bolts. The motor and the
compressor are inside the heavy
iron cast. This is the compressor
that can be fixed by removing
the bolts and shells that holding
it together.
There aren’t many residential
that used these types of
compressor, but you could find
in larger home and light
commercial. It can be fixed in the
field, if you have the necessary
air conditioner equipment.
Central air conditioning
compressor Video
Make sure to press the Play
button in the player controls to
watch it. Enjoy!
Central air conditioner
compressor Training Videos
made by Danfoss
How does a central air
conditioner compressor works?
The central air conditioner
compressor works by using an
electricity to energize the motor;
which it turns cause compressor
crankshaft to rotates.
Reciprocating compressors are a
piston-cylinder type of pump.
The main parts include a
cylinder, piston, connecting rod,
crankshaft, cylinder head and
valves. The operating cycle of a
reciprocating compressor is
shown below.
On the down stroke of the
piston, a low pressure area is
created between the top of the
piston, the cylinder head and the
suction line of the air
conditioning evaporator. Cold
refrigerant vapor rushes
through the suction valve inlet
and into the low pressure area.
On the up stroke, the suction
valve closes and the exhaust
(discharge) valve is forced open
with the increasing pressure. The
vapor is compressed and forced
into the discharge (high) side of
the refrigeration system.
When the piston reaches the top
of the cylinder, the discharge
valve closes, and the suction
valve opens as the piston starts
down again drawing in cold
refrigerant vapor to complete
the cycle.
Note that the connecting rod
attached between the crankshaft
and piston serves to change
rotary motion into reciprocating
(back and forth) motion.
The piston rings prevent the
vapor from escaping between
the piston and cylinder walls and
improve the operating
efficiency.
The compressor housing or
crankcase contains the bearing
surfaces for the crankshaft and
stores the oil that lubricates the
compressor parts.
The process of the air
conditioning compressors are
showed between points 1 and 2
on the PH chart.
In split- central air conditioner
units, the compressor is located
outside within the condenser
units. It ’s a vapor pump!
Compressors produce a pressure
different between the low side
(suction pressure) and high sides
(discharge pressure) of the
refrigeration system.
This is achieved by pulling of
low pressure, low temperature,
superheated refrigerant vapor
from the suction (evaporator)
side.
It pulls the correct amount of
refrigerant to fill the volume. The
refrigerant goes through the
compressor, after it crosses the
compressor it then creates a
high temperature, high pressure
superheated refrigerant vapor to
the high pressure side (air
conditioner condenser side).
The compression of the vapor
causes the transfer of heat
energy to flows from the low
side to the high side of the
system.
As the air conditioning
compressors compression the
refrigerant, additional heat is
added to the refrigerant. These
heats are:
1. Heat of compression
2. Mechanical friction heat
3. Compressors winding heat
4. Other suction line heat
The pressure different created
by the operation of the
compressor is responsible for
refrigerant flow through the
refrigeration cycle.
Steps On How To Post share Files or Image
1. Papano ba magshare ng FILES
A. Una pumunta sa FREE FILE HOSTING para makapag upload ng files.. Halimbawa filecargo, rapidshare at marami pang iba.
step1 browse file

step2 store/ upload file

step3 Pagkatapos ma-upload ang file, copy downloadlink

step4 paste downloadlink

step5

step6
Rename downloadlink para masmalinis tignan

Ganito na ung kalalabasan ng post...

2. Papano mag share ng image..
a. Gumawa ng account sa photobucket at pagkatapos
step1 browse image

step2 upload image

step3 Pagkatapos ma-upload, copy image code

step4 paste image code

Ganito na ang kalalabasan ng post Halimbawa lang..

A. Una pumunta sa FREE FILE HOSTING para makapag upload ng files.. Halimbawa filecargo, rapidshare at marami pang iba.
step1 browse file
step2 store/ upload file
step3 Pagkatapos ma-upload ang file, copy downloadlink
step4 paste downloadlink
step5
step6
Rename downloadlink para masmalinis tignan
Ganito na ung kalalabasan ng post...
2. Papano mag share ng image..
a. Gumawa ng account sa photobucket at pagkatapos
step1 browse image
step2 upload image
step3 Pagkatapos ma-upload, copy image code
step4 paste image code
Ganito na ang kalalabasan ng post Halimbawa lang..
Monday, December 6, 2010
Recipe Site
ito ay mga recipe sa pagluluto.
Best ito
http://pinoyfoodblog.com/
http://www.myfilipinorecipes.com
http://stepbysteprecipe.com
http://pinoyfoodblog.com
http://visualrecipes.com
http://www.filipinorecipe-tv.com
http://www.allfavoriterecipe.com
http://cookingngina.info
http://www.recipephillippines.com
http://www.filipinofoodrecipes.net
http://www.myfilipinorecipes.com/meat/
http://stepbysteprecipe.com/?cat=1133
http://visualrecipes.com/recipe-details/recipe_id/513/Filipino-BBQ/
http://www.allfavoriterecipe.com/
http://www.filipinofoodrecipes.net/sinigang.htm
http://kumain.com/category/vegetables-recipes/
Wednesday, June 30, 2010
Sirang USB Flash Drive, Ayusin natin.
details of selected device kailangan lahat yung VID, PID, Cip vendor & Part Number, and Part Vendor and Model
or better yet, take a screenshot like the example below,
Pakipost pati na rin brand at capacity ng USB Drive niyo para mas madaling solusyonan..
Have you experienced troubles with your USB like, Insert USB disk? or cannot format drive?
then im here to help... Paano?
First kailangan niyo itong CHIPGENIUS...
Ano ba ang CHIP Genius?
Nagamit ko po ito sa paghahanap ng solution sa problema ko dati sa USB Drive ko, Insert USB Disk siya nuon...
Ang tool po na ito ay hindi ko nagamit ko sa Pagrepair mismo ng USB kundi detect tool upang mahanap ang chip ID ng USB Drive... At tsaka nagdownload ng panglevel format para dun sa specific na USB ko...
Ito po screenshot:

[IMG]http://i814.photobucket.com/albums/zz61/basquipoks/chipgenius.jpg[/IMG]
Download niyo ito:CHIP GENIUS para madetect niyo ang Chip Vendor at Chip Part-Number...
Baka sakaling matulungan po namin kayo. Try po nating hanapan ng format tool ang USB niyo na may problema. Malay niyo magamit pa po ito para sa dagdag kita???. (Kapag hindi madisplay ang Vendor at Part Number, hindi pa po supported yan ng chip genius)
Hope this will help you....
Compilation of tools po...
Low Level Format Tool
HP Format Utility
Recuva Data Recovery Tool
ALCOR TOOL
Part 1
Part 2
Part 3
ICREATE TOOL
or
PDX Tool
PHISON TOOL
USBEST TOOL
or
USBEST TOOL2
SKYMEDI
Part 1
Part 2/font>
DR. UFD TOOL
Part 1
Part 2
Part 3
Part 4
FOR OTHER TOOLS, KINDLY VISIT http://FLASHBOOT.RU THEN SEARCH FOR CORRESPONDING TOOL, RUSSIAN SITE YAN KAYA USE GOOGLE TRANSLATE, GOOD LUCK!
or better yet, take a screenshot like the example below,
Pakipost pati na rin brand at capacity ng USB Drive niyo para mas madaling solusyonan..
Have you experienced troubles with your USB like, Insert USB disk? or cannot format drive?
then im here to help... Paano?
First kailangan niyo itong CHIPGENIUS...
Ano ba ang CHIP Genius?
Nagamit ko po ito sa paghahanap ng solution sa problema ko dati sa USB Drive ko, Insert USB Disk siya nuon...
Ang tool po na ito ay hindi ko nagamit ko sa Pagrepair mismo ng USB kundi detect tool upang mahanap ang chip ID ng USB Drive... At tsaka nagdownload ng panglevel format para dun sa specific na USB ko...
Ito po screenshot:
[IMG]http://i814.photobucket.com/albums/zz61/basquipoks/chipgenius.jpg[/IMG]
Download niyo ito:CHIP GENIUS para madetect niyo ang Chip Vendor at Chip Part-Number...
Baka sakaling matulungan po namin kayo. Try po nating hanapan ng format tool ang USB niyo na may problema. Malay niyo magamit pa po ito para sa dagdag kita???. (Kapag hindi madisplay ang Vendor at Part Number, hindi pa po supported yan ng chip genius)
Hope this will help you....
Compilation of tools po...
Low Level Format Tool
I think Universal na din ito, try niyo gamitin kapag hindi kaya ng tool na specifically for your device... Siguraduhing tama ang napiling Drive kasi baka yung hard disk niyo ang maformat niyo.. tsk tsk. Kapag nagamit niyo ito, hindi na po pwedeng irecover ang mga laman ng USB... brrr... |
HP Format Utility
pwede niyo magamit pag gusto niyo magrecover ng files sa HDD, USB, MMC... br.. |
Recuva Data Recovery Tool
ALCOR TOOL
Part 1
Part 2
Part 3
This is for: Chip Vendor: Alcor Chip Part- Number: AU6981~AU6983 |
ICREATE TOOL
or
This is for: Chip Vendor: iCreate Chip Part- Number: i5062-ZD |
PHISON TOOL
USBEST TOOL
or
USBEST TOOL2
SKYMEDI
Part 1
Part 2/font>
DR. UFD TOOL
Part 1
Part 2
Part 3
Part 4
FOR OTHER TOOLS, KINDLY VISIT http://FLASHBOOT.RU THEN SEARCH FOR CORRESPONDING TOOL, RUSSIAN SITE YAN KAYA USE GOOGLE TRANSLATE, GOOD LUCK!
Wednesday, March 3, 2010
How To Disable and Enable USBPort.
Make sure you have admin
rights.
hi here is the simply way to
block USB port try this,..................
To disable the access to USB port,
in windows XP and 2000:
1. Click Start, and then click Run.
2. In the Open box, type regedit,
and then click OK.
3. Locate, and then click the
following registry key:
HKEY_LOCAL_MACHINE\SYSTEM
\CurrentControlSet\Servic es
\UsbStor
4. In the right pane, double-click
Start.
5. In the Value data box, type 4,
click Hexadecimal (if it is not
already selected), and then click
OK.
6. Quit Registry Editor.
To re-enable a disabled port:
1. Click Start, and then click Run.
2. In the Open box, type regedit,
and then click OK.
3. Locate, and then click the
following registry key:
HKEY_LOCAL_MACHINE\SYSTEM
\CurrentControlSet\Servic es
\UsbStor
4. In the right pane, double-click
Start.
5. In the Value data box, type 3,
click Hexadecimal (if it is not
already selected), and then click
OK.
6. Quit Registry Editor.
__________________
How to create a lockedfolder in Win XP -
To create a locked folder we
need to create two batch files.
The first batchfile will “lock”
the folder (actually it will turn
the ordinary folder into a link
to the Control Panel using an
address code), and the other
one will “unlock” it. When
someone tries to access that
folder, he will be redirect to
Control Panel(we can in fact
type in any address code so that
the user could be redirected to
wherever we want). You should
hide these batch files, especially
the second one.
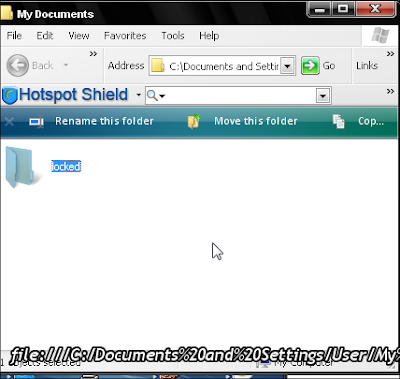
1. Create a folder, that you will
use to store your protected
data. For this example, I created
a folder called “locked”, and put
that folder in My Documents.
2. Open Notepad and copy this
code ren “FOLDERNAME”
“FOLDERNAME“.
{21EC2020-3AEA-1069-
A2DD-08002B30309D}
“FOLDERNAME” change in to
name of your folder, in this
example “FOLDERNAME” is
locked.My code looks like this ren
locked.{21EC2020-3AEA-1069-
A2DD-08002B30309D} locked
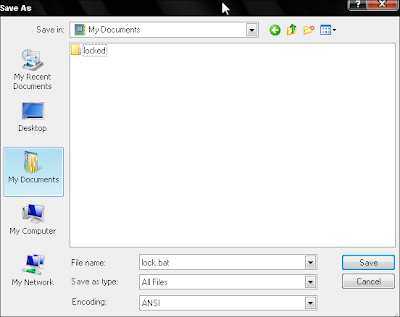
Save notepad file like lock.bat in
My Documents. In option Save as
Type, select All Files
3. Open another notepad file and
copy this code ren
“FOLDERNAME“.
{21EC2020-3AEA-1069-
A2DD-08002B30309D}
“FOLDERNAME” , Save file as in
Step 2, just choose a different
filename , like unlock.bat
After this we can see in My
Documents something like this:
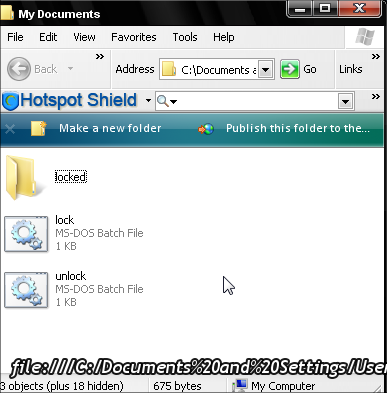
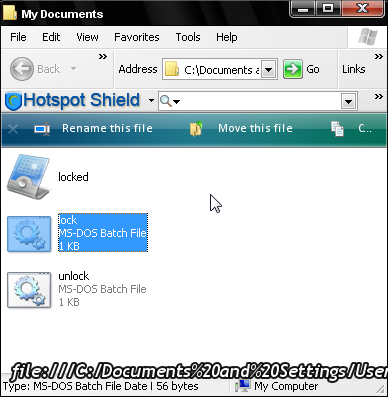
If we open (double click) lock.bat
our folder will turn into a link to
Control Panel, and the files will
not be visible. until we use
unlock.bat
REP+++++++++++++++++
We r notin bt pen in da hand of
creature!
Persian Forums
Persian
need to create two batch files.
The first batchfile will “lock”
the folder (actually it will turn
the ordinary folder into a link
to the Control Panel using an
address code), and the other
one will “unlock” it. When
someone tries to access that
folder, he will be redirect to
Control Panel(we can in fact
type in any address code so that
the user could be redirected to
wherever we want). You should
hide these batch files, especially
the second one.

1. Create a folder, that you will
use to store your protected
data. For this example, I created
a folder called “locked”, and put
that folder in My Documents.

2. Open Notepad and copy this
code ren “FOLDERNAME”
“FOLDERNAME“.
{21EC2020-3AEA-1069-
A2DD-08002B30309D}
“FOLDERNAME” change in to
name of your folder, in this
example “FOLDERNAME” is
locked.My code looks like this ren
locked.{21EC2020-3AEA-1069-
A2DD-08002B30309D} locked
Save notepad file like lock.bat in
My Documents. In option Save as
Type, select All Files
3. Open another notepad file and
copy this code ren
“FOLDERNAME“.
{21EC2020-3AEA-1069-
A2DD-08002B30309D}
“FOLDERNAME” , Save file as in
Step 2, just choose a different
filename , like unlock.bat
After this we can see in My
Documents something like this:

If we open (double click) lock.bat
our folder will turn into a link to
Control Panel, and the files will
not be visible. until we use
unlock.bat

REP+++++++++++++++++
We r notin bt pen in da hand of
creature!
Persian Forums
Persian
Hides Ur Drives/Lock UrDrives -
Open Registry (go to run
command, type “regedit” and
press enter)
then go to this key
HKEY_CURRENT_USER\Software
\Microsoft\Windows\Curre
ntVersion\Policies\Explorer
now right click in right side pane
and create DWORD Value (blue
color)
Rename it as
“NoViewOnDrive” (for locking
drive)
or
Rename it as “NoDrives” (for
Hiding drive)
double click on it and put some
numbers to lock ur desired Drive
and click ok.
DRIVE NOS.
FOR A : 1
FOR C : 4
FOR D : 8
FOR E: 16
FOR F: 32
FOR G: 64
FOR H:128
finally restart or log-off the
computer to take effect.
Keep in mind that “0″ is Default
Value to Disable or remove this
setting..
After locking the drive when u
try to open it, u will see a
msgbox like this
“This operation has been
cancelled due to restrictions in
effect on this computer. Please
contact your system
administrator”
Monday, February 22, 2010
How to Fully DisableWindows Automatic Updates
To fellow technicians.... This will
show you how to disable
windows automatic updates...
thus preventing you from
getting WGA Notifications(you
are a victim of software
counterfeiting message). There is
no need for any WGA patch
when you successfully did this.
Do this on a newly stalled
windows xp pro or windows xp
pro that has not been detected
yet as COUNTERFEIT.
Step 1. Click Start, select Control
Panel.
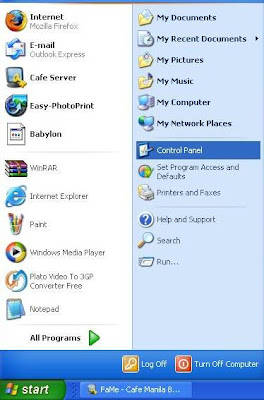
Step 2. Select Automatic Updates
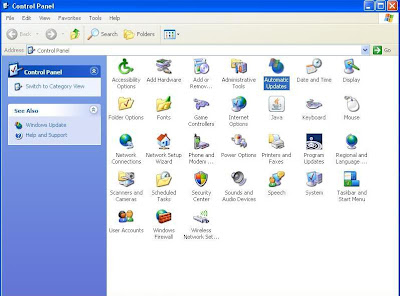
Step 3. Select Turn Off Automatic
Updates

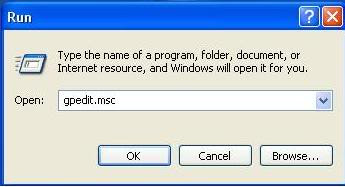
Step 4. Click Start, select Run
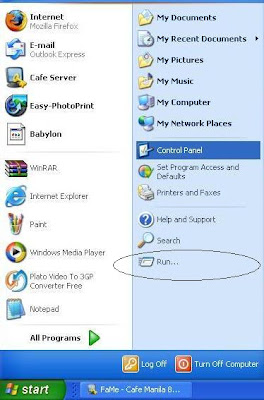
Step 5. Type gpedit.msc
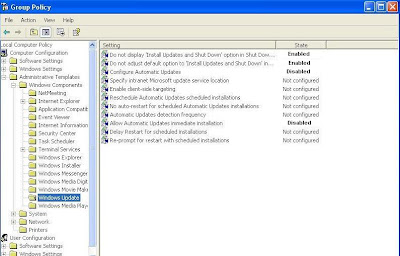
Step 6. Under Computer
Configuration, choose
Administrative Templates, then
Windows
Components then select
Windows Update
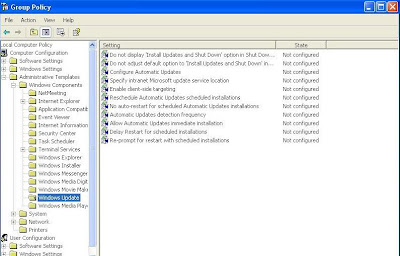
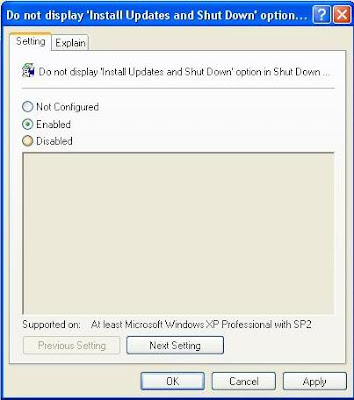
Step 7. Select "Do not display
'Install updates and Shutdown' in
Shutdown Windows Dialog
Box. Select 'Enabled' then ok.
Follow this configuration:
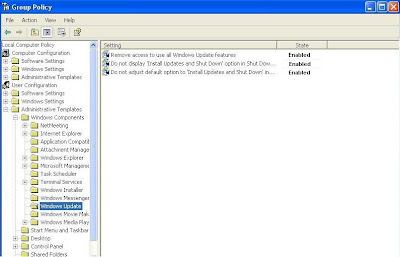
Step 8. Under User Configuration,
choose Administrative
Templates, then Windows
Components then select
Windows Update. Follow this
configurations:
FINISH
Other things you can do with
gpedit.msc
1. Remove recycle bin icon on
desktop.
2. Disable Display Properties and
Control Panel.
Explore niyo na lang kung ano
pa magagawa niyo restrictions
dito...
show you how to disable
windows automatic updates...
thus preventing you from
getting WGA Notifications(you
are a victim of software
counterfeiting message). There is
no need for any WGA patch
when you successfully did this.
Do this on a newly stalled
windows xp pro or windows xp
pro that has not been detected
yet as COUNTERFEIT.
Step 1. Click Start, select Control
Panel.

Step 2. Select Automatic Updates

Step 3. Select Turn Off Automatic
Updates

Step 4. Click Start, select Run

Step 5. Type gpedit.msc

Step 6. Under Computer
Configuration, choose
Administrative Templates, then
Windows
Components then select
Windows Update

Step 7. Select "Do not display
'Install updates and Shutdown' in
Shutdown Windows Dialog
Box. Select 'Enabled' then ok.

Follow this configuration:

Step 8. Under User Configuration,
choose Administrative
Templates, then Windows
Components then select
Windows Update. Follow this
configurations:

FINISH
Other things you can do with
gpedit.msc
1. Remove recycle bin icon on
desktop.
2. Disable Display Properties and
Control Panel.
Explore niyo na lang kung ano
pa magagawa niyo restrictions
dito...
Sunday, February 21, 2010
How to Boot & Install WindowsXP/Vista/Win 7 from a USBDrive
I have come up with my very
own tutorial on how to install
Windows XP/Vista/Windows 7
using USB drive
Quote:
This tutorial works for me on
Windows 7 and Windows XP
SP3 using Laptop Acer Aspire
One and IBM Lenovo Desktop
Quote:
May or may not work on old
computer platform
This instruction base on
Windows XP installer
Things you need:
Microsoft Windows XP SP3
Professional Genuine
Bootable MSDN ISO [Single
Link]
Quote:
http://
www.gsmsandwich.com.ph/
forum/...&postcount=896
OR
Windows Vista AIO SP2 Auto
Activation 49 OEM l 3.17 GB
Quote:
http://
www.gsmsandwich.com.ph/
forum/...&postcount=953
OR
Windows 7 ULTIMATE
32+64bit RETAIL- Original
MSDN + Activators
Quote:
http://
www.gsmsandwich.com.ph/
forum/...&postcount=954
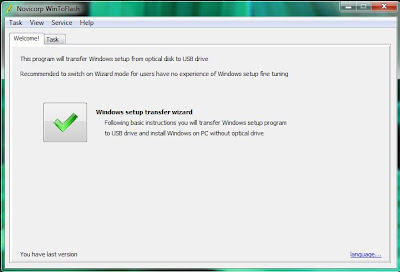
-WintoFlash [Freeware tool]
Quote:
http://wintoflash.com/
download/en/
-A USB Flash Drive [At least 1GB
for XP and 4GB for Vista or
Windows 7]
Windows 7 Installation Tutorial.
If needed
- Magic ISO [hope you have this
installed in your PC]
Quote:
http://rapidshare.com/
files/22047653...y.tano1221.rar
Quote:
http://www.megaupload.com/?
d=A6PEWOII
Guide
Step 1 [Preparing Windows
Files]
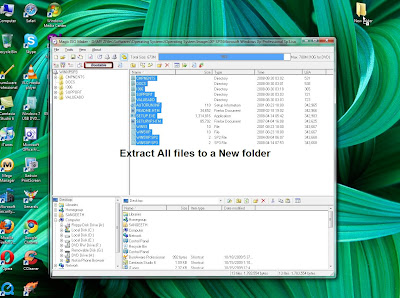
-Open your Windows XP ISo
with Magic ISO
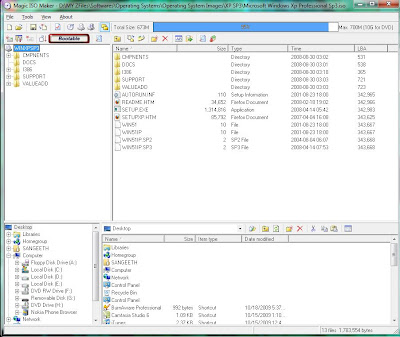
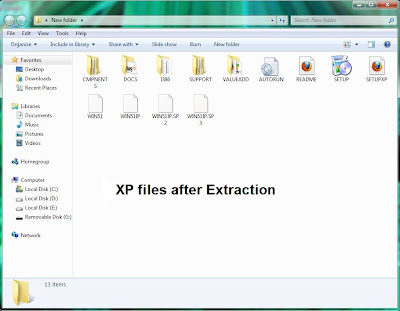
-Extract all windows files to a
new folder
-After Extraction
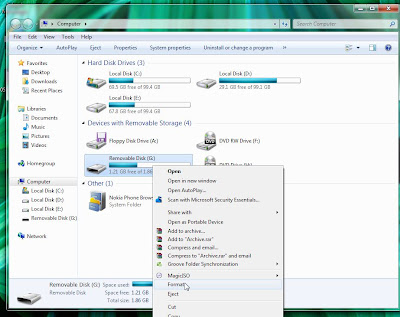
Preparing you Flash Drive
-Insert your Flash drive and
Format it
Preparing Bootable USB
-Download wintoflash and Open
the Main GUI [WinToFlash]
-Click Task and Select Windows
XP in the List

-Select your USB drive and
where you extracted the
Windows File
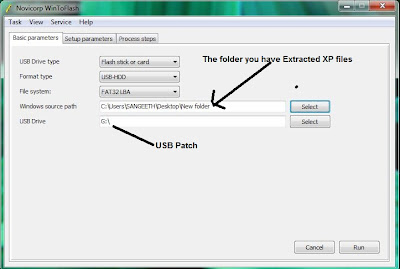
-Now Press Run
-Agree the License and
agreement
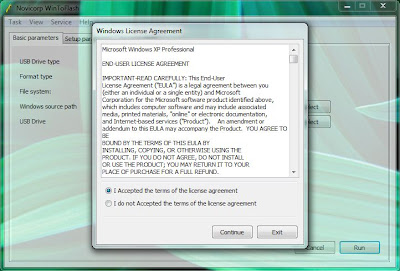
-It will format your Flash drive
Again

-Then the Tool will Copy the
Files to Flash
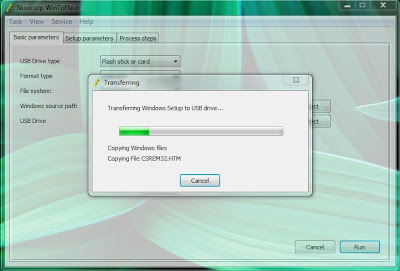
-Wait until it's finished
Boot up from USB
-Now restart your PC and Enter
your BIOS setting at Start-up
-Change Boot Oder to USB drive
[make sure you have already
plugged your USB]
-Then Restart your PC [Save
Changes in BIOS before Restart
-Now you can able to Boot From
your USB Drive
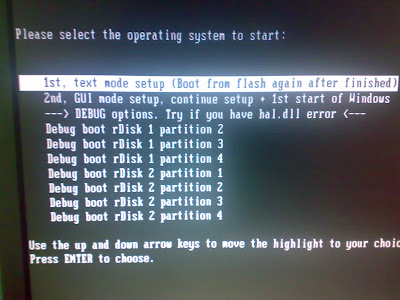
If you successfully follow the
instruction you will get this
menu when you boot to USB
Install Xp from USB select First
option in this Menu
COMPO
own tutorial on how to install
Windows XP/Vista/Windows 7
using USB drive
Quote:
This tutorial works for me on
Windows 7 and Windows XP
SP3 using Laptop Acer Aspire
One and IBM Lenovo Desktop
Quote:
May or may not work on old
computer platform
This instruction base on
Windows XP installer
Things you need:
Microsoft Windows XP SP3
Professional Genuine
Bootable MSDN ISO [Single
Link]
Quote:
http://
www.gsmsandwich.com.ph/
forum/...&postcount=896
OR
Windows Vista AIO SP2 Auto
Activation 49 OEM l 3.17 GB
Quote:
http://
www.gsmsandwich.com.ph/
forum/...&postcount=953
OR
Windows 7 ULTIMATE
32+64bit RETAIL- Original
MSDN + Activators
Quote:
http://
www.gsmsandwich.com.ph/
forum/...&postcount=954
-WintoFlash [Freeware tool]
Quote:
http://wintoflash.com/
download/en/
-A USB Flash Drive [At least 1GB
for XP and 4GB for Vista or
Windows 7]
Windows 7 Installation Tutorial.
If needed
- Magic ISO [hope you have this
installed in your PC]
Quote:
http://rapidshare.com/
files/22047653...y.tano1221.rar
Quote:
http://www.megaupload.com/?
d=A6PEWOII
Guide
Step 1 [Preparing Windows
Files]
-Open your Windows XP ISo
with Magic ISO

-Extract all windows files to a
new folder

-After Extraction

Preparing you Flash Drive
-Insert your Flash drive and
Format it

Preparing Bootable USB
-Download wintoflash and Open
the Main GUI [WinToFlash]

-Click Task and Select Windows
XP in the List

-Select your USB drive and
where you extracted the
Windows File

-Now Press Run
-Agree the License and
agreement

-It will format your Flash drive
Again

-Then the Tool will Copy the
Files to Flash

-Wait until it's finished
Boot up from USB
-Now restart your PC and Enter
your BIOS setting at Start-up
-Change Boot Oder to USB drive
[make sure you have already
plugged your USB]
-Then Restart your PC [Save
Changes in BIOS before Restart
-Now you can able to Boot From
your USB Drive
If you successfully follow the
instruction you will get this
menu when you boot to USB
Install Xp from USB select First
option in this Menu

COMPO
Thursday, February 18, 2010
splitting files using winrar
tapos ang problema, may
kalakihan kunwari ang file,
like, 4mb..
so pano natin yan upload dito?
dapat, split mo siya using
winrar..
ganito gagawin niyo..
example ko yung isang
nadownload ko dito na music
video ng foo figher.. medyo
malaki siya, 4.something yung
size niya eh ang maximum
single upload na allowed dito
sa eh, 2mb diba?
-------------------------------
1. una, right click niyo yung
file na gusto niyo iupload dito
tapos click niyo yung add to
archive..

2. ngayon pagkaclick niyo
yung add to archive, lalabas
yung parameter window ng
archive mo..
makikita mo sa may lower part
ng parameter window yung
split to volume, bytes..
dun niyo lagay yung size ng
pagkakasplit..
eh ang target natin 2mb diba?
so ang nilagay ko dun ay 2M..

3. pag nalagay niyo na yung
2M, click niyo na yung OK, at
eto na yung lalabas na
nacompress na file.. instead na
iisa lang, nahati-hati into
parts..
------------------
maganda ito pag sa mga hindi
naman masyadong malaki na
files..
sana nakatulong sa inyo ito.
kalakihan kunwari ang file,
like, 4mb..
so pano natin yan upload dito?
dapat, split mo siya using
winrar..
ganito gagawin niyo..
example ko yung isang
nadownload ko dito na music
video ng foo figher.. medyo
malaki siya, 4.something yung
size niya eh ang maximum
single upload na allowed dito
sa eh, 2mb diba?
-------------------------------
1. una, right click niyo yung
file na gusto niyo iupload dito
tapos click niyo yung add to
archive..

2. ngayon pagkaclick niyo
yung add to archive, lalabas
yung parameter window ng
archive mo..
makikita mo sa may lower part
ng parameter window yung
split to volume, bytes..
dun niyo lagay yung size ng
pagkakasplit..
eh ang target natin 2mb diba?
so ang nilagay ko dun ay 2M..

3. pag nalagay niyo na yung
2M, click niyo na yung OK, at
eto na yung lalabas na
nacompress na file.. instead na
iisa lang, nahati-hati into
parts..

------------------
maganda ito pag sa mga hindi
naman masyadong malaki na
files..
sana nakatulong sa inyo ito.
Wednesday, February 17, 2010
Sonne Screen Video Capture - FullVersion
kung hindi makuntento sa
screenshot, tamang-tama itong
software na ito sa pag-capture
ng ginagawa niyo as VIDEO.
ito ang para sa inyo.
effective ito sa tutorial mga
boss...
Sonne Screen Video Capture - Full
Version
madali naman pong gamitin,
kahit walang guide.
pero heto narin po ang
screenshots ng paggamit in case
malito po kayo...


----------
----------
----------
----------
----------
----------
DOWNLOAD HERE:
www.megaupload.com/?d=LCJAK7T4
depositfiles.com/en/files/69m538jex
pl.hotfile.com/dl/25079267/c020f0e/Sonne.Screen.Video.Capture.v7.0.0.651.zip
rapidshare.com/files/344165882/Sonne.Screen.Video.Capture.v7.0.0.651_-_screenshot_video_recording.zip.html
www.sendspace.com/file/1qr4f6
Saturday, February 13, 2010
Uninstall Any Application (For those who have installed any app which is not uninstalling now)
Again i have got a very
interesting info for you now you
can uninstall any app installed in
c or e drive or even in the z rom
drive if it is possible to edit from
pc.
Whenever files are installed on
our devices their registry info or
you can say files info is stored in
the c:sysinstallsisregistry . Even
the files info of the files stored in
the zrom derive in present in the
c drive. For example the list of
files of nokia web browser is
stored in
c:sysinstallsisregistry100083d90000000.reg
file. Rename the file
00000000.reg to
00000000.reg.txt with xplore
and open it and you will get the
list of all the files of nokia web
browser with their paths stored
in the zrom. You can even
change your web browser with
any other web browser of any
other nokia 3rd edition device
by getting its all the files and
then manually placing them in
the same route in the c: or e:
drive as they were present in the
z drive of the other drive as
given in the .reg file of the web
browser of the other device or
any other application which you
want at your own risk.
When you install any sis file
a .reg file is created in the c:
derive only. So to uninstall any
disturbing application like any
quick office version just find
its .reg file by cheaking folders in
the c:sysinstallsisregistry and
manually delete all the
componants. This process is time
consuming but 100% working.
Google Searching Trick
Did you experienced sitting in
front of your computer or
browsing using your mobile
searching Google looking for
files or information that you
want to know but you spend a
lot of time but you cant find
what you are looking for.
Well with this simple yet so
powerful trick,you can do your
searching in Google so easy with
a less time an with great results.
Just follow these guides:
1. Dont ask Question,Google is
not a Human that everytime you
ask them they will goingt to
reply to your question.Meaning
dont start your keyword by
Why,Where ,When or What etc.
2. Be specific.The less keyword
you use the more closer results
you can get.
3. Finally, this is the trick.Google
can a set special of commands to
make your searching so
powerful.
Just enter this set of string in a
search bar without spaces and in
exact format.
intitle:”index.of”(mp3)akon
Click Search.
Noticed that those results you
got is very specific and Google
gives you the result in a Parent
Directory of a page.
Explanation:
intitle: is a Google command that
specify your search in the “Title”
and contents of a webpage.
“index.of” : is a Google
command that specify your
search within the index or a
Parent Directory of a webpage.
(mp3) : is a type of a file that
you want to search.
Akon : is a filename,an Artist or
the title of the file that your
looking.In that example
above ,im looking an mp3 song
of Akon so i used Akon.It maybe
differ depends on the type of
file that you are looking.
Example,if would like to find a
music video of Avril Lavigne in
3gp format,my keyword will be:
intitle:”index.of”(3gp)avril
lavigne
Or if i want in mp4 format,the
keyword is
intitle:”index.of”(mp4)Avril
Lavigne
Heres are some other file types/
extensions that you can use.
For compressed files:
(rar)
(zip)
E-Books/Tutorials
(pdf)
(chm)
Images/Graphics
(jpg) or (jpeg)
(gif)
(png)
Sounds/Audio
(mp3)
(wma)
Movie/Music Video
(wmv)
(avi)
(3gp)
(mp4)
Executable files/PC Applications
(exe)
(msi)
Mobile Applications
(sis)
(sisx)
(jar)
Enjoy!!
Subscribe to:
Posts (Atom)