Panasonic
CW-C104VPH
2554.43 btu (1 hp)
Condura
Fp-wconcoo6ec
1272.222(0.5 hp)
Condura
Wconnt014ea
13,200 kj/h
1,178w
1.5 hp[/quote]
Ito po ay para malaman kung anong size ng aircon ang gagamitin para sa mga kuwarto. By square cube per meter.
10-14 sq.
1/2 hp
14-18 sq.
3/4 hp
20-25 sq.
1.5 hp
26-35 sq.
2 hp.
36-45 sq.
2.5hp
Sunday, March 25, 2012
Re: (solve) No Frost, hindi lumalamig ang ibaba, ang itaas ay na
Problem:
No Frost refrigerator - hindi lumalamig ang ibaba, sa itaas ay nag yeyelo.
1. Check ang fan sa loob, (umaandar naman, good pa)
2. Check ang heater ( iniikot ang timer para maset ang heater, ok naman, umiinit, good pa)
3. Check ang defrost timer (pinanghinalaan na ito dahil madalas itöng masira kapag pinapasok ng langgam, pinalitan ng bagong timer, after ng isang linggo, ganun pa din, nagyeyelo sa itaas, at sa ibaba ay di lumalamig)
4. Check ulit ang itaas, binaklas. Tinunaw muna ang yelo sa evaporator para ma check, napansin ko di ko malaman kung saan dumadaan ang natunaw na tubig ng yelo. Barado pala ang drain plug, natiyak ko yun dahil walang lumalabas na tubig sa likod ng refrigerator. May sarahuran ng tubig dun walang lumalabas na tubig na natunaw na yelo sa itaas. Ang ginawa ko, sinundot ko ng kawad ang drain hose, mula sa likod ng ref. sa ilalim pataas sa evaporator. Medyo mahirap, at matigas ang pagsundot at ingat na din na matamaan ng tubo (hayun ok na ang ref. Maganda na ang lamig)[/quote]
Basic refrigeration, my tutorial
How to know the STARTING, COMMON and RUNNING terminal of the compressor motor

gagamit tayo ng tester na naka setting sa ohms or resistance.
RS =highest reading
CS
=medium reading
CR
=lowest reading
sa larawan nilagyan natin ng number 1,2,3
1-2 = 3 ohm CR
1-3 = 7 ohm RS
2-3 = 5 ohm CS
madali lang naman malaman kung alin dito common, starting at running.
Ang 1-2 ay CR kaya lowest reading ito ay walang 3 kaya ito ay para sa terminal 3, ito ay CR, at sa CSR, wala itong S, kaya starting ito
Ang 1-3 ay RS Highest Reading, terminal 2, at C Common, yun ang wala sa kanya.
Ang 2-3 ay CS medium reading, kaya terminal 1, at running
sagot:
3 = S
2 = C
1 = R
another example:
1-2 = 3 ohm CR 3 = S
1-3 = 5 ohm CS 2 = R
2-3 = 7 ohm RS 1 = C
madali ding mag test kahit hindi ka na magsulat. Kapag ang tester halimbawa ay itinutok mo sa terminal 1 at 3 kung yun ang mataas ang 1-3 ang katapat nun na 2 ang sinusukat mo kaya ang 2 ang common. Kung 2-1 ay lowest ang katapat n 3 ang sinusukat mo at ang 3 ang starting.
Re: Basic refrigeration, my tutorial
Reference
http://www.air-conditioning-and-refrigeration-guide.com/refrigeration-cycle.html
Refrigeration =process of removing heat from a close space.
1. Compressor motor =use to compress low pressure, low temp. to high pressure, high temp. refrigerant required by the system.
2. Discharge Line =passage of compress hot gas refrigerant.
3. Condenser or Condensing coil =use to give-off heat, transfer of heat to the cooling medium or atmospheric temperature.
4.Filter/Drier
A. Filter =use to screen dirt, sludge, scale and foriegn matter.
B. Drier =use to absorve moisture circulating to the system.
5. Capillary Tube =use to regulate, control the flow of refrigerant (ang tawag ng iba dito ay expansion valve at mahalaga ito para magkaroon ng evaporation)
6. Evaporator Coil or Cooling coil =use to absorb heat inside close space.
7. Accumulator Tube =use to hold the remaining liquid refrigerant. (dito maipon ang liquid refrigerant na hindi naging gas or nag evaporate, para di pumunta ang liquid sa compressor na dahilan kung bakit masisira, malulunod ng liquid ang compressor, ang trabaho nya ay mag pump lang ng gas.)
8. Suction Line =passage of vapor refrigerant.
Vapor =low pressure,low temperature gas
Freezing Temperature of water = 0 centigrate or 32 farenheight
Melting point of water =1 centigrate to 20 centigrate in 3 hour.
Tuesday, May 24, 2011
[TUT] Install Windows XP Operating System in less than 15 minutes
Now, this tip will be very helpful for those who frequently install windows xp operating system.
Normally OS installation takes
around 40 minutes to complete, but through this trick you can now save 10-15 minutes. This simple tricks goes this way.
Boot through Windows XP CD.
2. After all the files are completely
loaded, you get the option to select the partition. Select “c”.
3. Now Format the partition,
whether it is normal or quick with NTFS or FAT
4. Once the formatting is completed, All the setup files required for installation are copied. Restart your system by pressing Enter. Now, here begins the Simple trick to save 10-15 minutes.
5. After rebooting, you get a screen where it takes 40 minutes to complete or finalize the OS installation.
6. Now, Press SHIFT + F10 Key -> This opens command prompt.
7. Enter “Taskmgr” at the command prompt window. This will open Task Manager.
8. Click the Process Tab, here we find a process called Setup.exe -> Right Click on Setup.exe -> Set Priority -> Select High or Above Normal.
Initially it will be Normal.[/B]
That's it, no more work to do. Relax
your self and see how fast the
installation process completes.
Feedbacks:
Friday, May 20, 2011
Paggawa ng Bootable USB XP/Vista/Windows7 Step by Step Tagalog Version
Mas madali itong gamitin kasi para kang nag pormat ng katulad sa CD-rom.. at walang nabago...
tested 100% sa maraming laptop na
simulan po na po natin
mga kailangan:
cd/dvd na xp/vista/windows7 o kung ano gusto mong gawing bootable usb
for xp/vista-atleast 1gb
for windows 7-atleast 4gb
cd/dvd rom
ultra iso
para sa ultra iso download this file may kasama ng patcher yan
wag po kayong gagamit ng lumang ultra iso kaya download nyo na lang to
http://www.mediafire.com/?las8rmremyhlf59
download and install
tapos open nyo na ultra iso nyo at ilagay nyo na cd/dvd os nyo pwede xp
vista or windows 7 etc.
click tools tapos yung make cd/dvd image

pili na lang kayo ng location kung saan nyo gustong ilagay

wait nyong matapos

pag tapos na open ultra iso ulet click nyo yung file the open

eto ang lalabas at hanapin nyo yung ginawa nyong image

saksak nyo na sa computer nyo ang usb nyo click nyo naman yung bootable then write disk image
check nyo yung may red circle dapat ganyan ang gagawin nyong format... pwede nyong reformat muna
usb nyo or direct write.

pag katapos nyan smile kna lang done dapat pag salpak nyo sa usb nyo ganito lalabas

tips and tricks
may iba pong usb bootable os na auto boot ibig sabihin pag salpak mo ng usb kahit walang kang press
mag boboot na sya.. kaya kelangan mong bantayan pag nag restart na yung os hugutin mo usb mo
tapos wait mong lumagpas sa boot screen then salpak mo ulet para mag tuloy ulet done..
tested 100% sa maraming laptop na
simulan po na po natin
mga kailangan:
cd/dvd na xp/vista/windows7 o kung ano gusto mong gawing bootable usb
for xp/vista-atleast 1gb
for windows 7-atleast 4gb
cd/dvd rom
ultra iso
para sa ultra iso download this file may kasama ng patcher yan
wag po kayong gagamit ng lumang ultra iso kaya download nyo na lang to
http://www.mediafire.com/?las8rmremyhlf59
download and install
tapos open nyo na ultra iso nyo at ilagay nyo na cd/dvd os nyo pwede xp
vista or windows 7 etc.
click tools tapos yung make cd/dvd image
pili na lang kayo ng location kung saan nyo gustong ilagay
wait nyong matapos
pag tapos na open ultra iso ulet click nyo yung file the open
eto ang lalabas at hanapin nyo yung ginawa nyong image
saksak nyo na sa computer nyo ang usb nyo click nyo naman yung bootable then write disk image
check nyo yung may red circle dapat ganyan ang gagawin nyong format... pwede nyong reformat muna
usb nyo or direct write.
pag katapos nyan smile kna lang done dapat pag salpak nyo sa usb nyo ganito lalabas
tips and tricks
may iba pong usb bootable os na auto boot ibig sabihin pag salpak mo ng usb kahit walang kang press
mag boboot na sya.. kaya kelangan mong bantayan pag nag restart na yung os hugutin mo usb mo
tapos wait mong lumagpas sa boot screen then salpak mo ulet para mag tuloy ulet done..
Saturday, March 5, 2011
fan motor, umaandar sa una, mayamaya ay namamatay
[b]fan motor, umaandar sa una, mayamaya ay namamatay[/b]
Ito ay dahil leaky na ang capacitor, palitan ng bagong capacitor.
Ito ay dahil leaky na ang capacitor, palitan ng bagong capacitor.
Sunday, February 27, 2011
Electronic
www.petervaldivia.com/technology/electricity/resistance-and-ohm-law.php
http://www.clear.rice.edu/elec201/Book/basic_elec.html
http://www.electronicsteacher.com/tutorial/
http://alignment.hep.brandeis.edu/Lab/Tutorial.html
http://informe.com/electronics/electronics_tutorial/
http://www.kpsec.freeuk.com/symbol.htm
http://www.allaboutcircuits.com/vol_1/chpt_1/7.html
http://www.electronicsandyou.com/electronics-basics/diode.html
http://www.kpsec.freeuk.com/components/diode.htm
http://www.rapidtables.com/electric/electrical_symbols.htm
http://www.rapidtables.com/electric/electrical_symbols.htm
http://www.opamp-electronics.com/tutorials/dc_theory.htm
http://www.ikalogic.com/beg_1_res_v_c.php
http://www.ikalogic.com/beg_1_res_v_c.php
http://www.ikalogic.com/beg_1_res_v_c.php
http://www.hobbyprojects.com/tutorial.html
http://www.hobbyprojects.com/tutorial.html
http://www.khazar.com/academics/portal/ucsc/2010fall/danm219/meeting02.php
http://www.hobbyprojects.com/schematics_circuits_symbols.html
http://paulgorman.org/misc/electronics/
http://www.electronics-tutorials.ws/dccircuits/dcp_1.html
http://www.best-microcontroller-projects.com/schematic-symbols.html
http://www.kpsec.freeuk.com/components/tran.htm
http://www.electronics-tutorials.ws/capacitor/cap_2.html
http://www.technologystudent.com/images5/sw5.gif
Tuesday, February 22, 2011
Magpastart ng genset ngrekta, walang ignition switch Itong starter, ay pagshortedin
[b]Magpastart ng genset ng rekta, walang ignition switch[/b]
[list][url=http://www.imagehosting.com/][img]http://piczasso.com/i/pw1zl.jpg[/img][/url]
Itong starter, ay pagshortedin ang dalawang linya na ito, gumamit ng wire para magshorted at umandar ang genset.[/list]
[list][url=http://www.imagehosting.com/][img]http://piczasso.com/i/pw1zl.jpg[/img][/url]
Itong starter, ay pagshortedin ang dalawang linya na ito, gumamit ng wire para magshorted at umandar ang genset.[/list]
Umaandar ang aircon sa simula, after 1 hour patay. Aandar ul
Umaandar sa unang buhay ang
aircon. Tapos mamatay.
[color=red] posible cause[/color]
Maaring madumi na ang aircon. Kelangang linisin
(nilinisan na ang aircon, ganun pa din)
Dahil may leak back na ang
compressor. Kapag pinatay mo
ang compressor. Hipuin ito sa
suction line ang normal ay
malamig ito. Kung paghipo ay
mainit, may leak back ang compressor.
Nag trip ang breaker ngwindow a/c
Nag trip ang breaker ng
window type aircon
[color=red] warning:[/color]
Huwag nyong buhayin agad
ang a/c, maaring shorted na
ang compressor nito kaya nag
trip ang breaker. Sasabog ang
terminal ng compressor at
mabubutas, tatalsik ang freon at langis, magkakalat pa kayo.
Siguraduhing i check ang
compressor.
[color=red]ganito ang dapat gawin.[/color]
Namatay ang aircon, naka on naman ito, walang supply sa saksakan.
Then na check nyo ang breaker nya ay nag trip.
Huwag itaas or ibalik ang breaker. Bunutin ang saksakan ng a/c. I check nang mabuti ang ac, maaring sumabog ang aircon., alamin muna ang dahilan kung bakit nag trip ang breaker. Bago sya ibalik sa dati.
Monday, February 21, 2011
Electronic Symbols
Electronic Symbol
antenna [url=http://img3.imagehyper.com/img.php?id=580949&c=fe2981f1093b267fb3701fbc02c224ce][img]http://img3.imagehyper.com/t/0/0/580/580949-bc2cdb50.gif[/img][/url]
Antenna Coil [url=http://img3.imagehyper.com/img.php?id=581562&c=f98deae3ab52202a673d8276efc4e899][img]http://img3.imagehyper.com/t/0/0/581/581562-3870f46b.jpg[/img][/url]
I.F. (intermidiate frequency) transformer [url=http://img3.imagehyper.com/img.php?id=581655&c=3351c92403eafd4f21662bcfe9ed4488][img]http://img3.imagehyper.com/t/0/0/581/581655-f47bad72.jpg[/img][/url]
Ang I.F. transformer ay makikita nyo sa radyo na may kulay puti, yellow at black.
[url=http://img3.imagehyper.com/img.php?id=595953&c=6d278b468ce26c3b11a9c2fbea9c747f][img]http://img3.imagehyper.com/t/0/0/595/595953-43e2e8da.jpg[/img][/url]kung makikita nyo ang signal ay lumabas na nakuha sa air, or radio station. Ang ginagawa ng if transformer ,tingnan sa picture. Ay pinapaganda nya ang tunog, mula sa 99% clear papunta sa 100% clear, papunta sa speaker at maririnig na natin.
Oscillator
Coil [url=http://img3.imagehyper.com/img.php?id=581658&c=dd92fa9135a444592f31bbc3827b0b24][img]http://img3.imagehyper.com/t/0/0/581/581658-cc929b18.jpg[/img][/url]ang kulay nya ay red.
[url=http://img3.imagehyper.com/img.php?id=595976&c=cd78da80d842540046b2758ed4af0c24][img]http://img3.imagehyper.com/t/0/0/595/595976-e086d803.jpg[/img][/url]
Interstage transformer [url=http://img3.imagehyper.com/img.php?id=581662&c=263454fc4eb825fb2412f2073945e812][img]http://img3.imagehyper.com/t/0/0/581/581662-8c499f61.jpg[/img][/url]
Output transformer [url=http://img3.imagehyper.com/img.php?id=581545&c=80fd30e7e90900614218afe814d66d02][img]http://img3.imagehyper.com/t/0/0/581/581545-2aee7fb0.gif[/img][/url] [url=http://img3.imagehyper.com/img.php?id=581557&c=6e32e0557dbddc6ecf6d5d9f4fbfb11f][img]http://img3.imagehyper.com/t/0/0/581/581557-7f4b80bc.gif[/img][/url]
Resistor [url=http://img3.imagehyper.com/img.php?id=582165&c=6717b00e21e6c0cb0db7a7c8a3111791][img]http://img3.imagehyper.com/t/0/0/582/582165-e2fb57b0.jpg[/img][/url] [url=http://img3.imagehyper.com/img.php?id=582065&c=d55eb1f82749c9e3afe606cad11e9b2e][img]http://img3.imagehyper.com/t/0/0/582/582065-f5ad1850.jpg[/img][/url]
Thermistor [url=http://img3.imagehyper.com/img.php?id=582091&c=15984c340d1b40d46b3997339eef74c6][img]http://img3.imagehyper.com/t/0/0/582/582091-ce0d1229.jpg[/img][/url]
Volume control [url=http://img3.imagehyper.com/img.php?id=582093&c=fe9ed3359eca3b7823a21e4ae599aa13][img]http://img3.imagehyper.com/t/0/0/582/582093-c39fd829.jpg[/img][/url]
Capacitor [url=http://img3.imagehyper.com/img.php?id=582112&c=89d6ecb1d59bb3b2f486eea426a272e4][img]http://img3.imagehyper.com/t/0/0/582/582112-5592208d.jpg[/img][/url][url=http://img3.imagehyper.com/img.php?id=582117&c=56b7b16d53bf7e352286d63b0c88b009][img]http://img3.imagehyper.com/t/0/0/582/582117-a62e4f34.jpg[/img][/url]
Valuable capacitor [url=http://img3.imagehyper.com/img.php?id=582123&c=29463a768c2c1cc18c1c0621dcdadff5][img]http://img3.imagehyper.com/t/0/0/582/582123-5506e798.jpg[/img][/url]
Diode [url=http://img3.imagehyper.com/img.php?id=582127&c=9b5e0550252296336b1d59eb21588d00][img]http://img3.imagehyper.com/t/0/0/582/582127-460f37c2.jpg[/img][/url]
Battery [url=http://img3.imagehyper.com/img.php?id=582129&c=da09d66d6b39c8be26e56c0c8d389173][img]http://img3.imagehyper.com/t/0/0/582/582129-368d4e31.jpg[/img][/url]
Ground
Speaker [url=http://img3.imagehyper.com/img.php?id=582196&c=800ebeae3f372d13c3b9717dcd297fda][img]http://img3.imagehyper.com/t/0/0/582/582196-9a27c66f.jpg[/img][/url]
Wire connected [url=http://img3.imagehyper.com/img.php?id=582207&c=72a99ed23f69c78f053413af0a19ec76][img]http://img3.imagehyper.com/t/0/0/582/582207-fbf5ca3c.gif[/img][/url]
Wire not connected [url=http://img3.imagehyper.com/img.php?id=582216&c=ddd0949c431db61b2a9d1c4d3d2f9368][img]http://img3.imagehyper.com/t/0/0/582/582216-0c35ce22.gif[/img][/url]
Transistor [url=http://img3.imagehyper.com/img.php?id=582225&c=5080dd20ba5dc16edf45fca2b19faede][img]http://img3.imagehyper.com/t/0/0/582/582225-7cb3fc70.jpg[/img][/url][url=http://img3.imagehyper.com/img.php?id=582236&c=05b701d96d36a0f6f855e31c896451d5][img]http://img3.imagehyper.com/t/0/0/582/582236-cc901774.gif[/img][/url]
[url=http://img3.imagehyper.com/img.php?id=582242&c=c30e2918b845e3f5b99002f7bb280d5a][img]http://img3.imagehyper.com/t/0/0/582/582242-3ba0af0d.gif[/img][/url]
Two kinds of transistor
1. NPN
2. PNP
[url=http://img3.imagehyper.com/img.php?id=582277&c=ac09a0895bbc72e19a48ada110247315][img]http://img3.imagehyper.com/t/0/0/582/582277-c014d364.jpg[/img][/url][url=http://img3.imagehyper.com/img.php?id=582280&c=489c1695f3d4e046a0e538d26ddba90e][img]http://img3.imagehyper.com/t/0/0/582/582280-dc26c75e.gif[/img][/url][url=http://img3.imagehyper.com/img.php?id=582301&c=46c8cdb245312dbaad903823a761247f][img]http://img3.imagehyper.com/t/0/0/582/582301-7a843547.gif[/img][/url][url=http://img3.imagehyper.com/img.php?id=582317&c=4cb62fac41f19e6e7ff1bb8ccb73c84d][img]http://img3.imagehyper.com/t/0/0/582/582317-b0359ed3.gif[/img][/url]
Monday, January 17, 2011
Fan motor for 1.5 hp or 1 ton aircön
0.68a 76w
Part. No. Ysk65-bj
Ccac part no. Ac361042
Rpm. 950/850 /750
Cap 3uf/440v
By Conception Carrier
Part. No. Ysk65-bj
Ccac part no. Ac361042
Rpm. 950/850 /750
Cap 3uf/440v
By Conception Carrier
Central air conditioner compressors
What are air conditioner
compressors?
Air conditioning compressor is
the heart of the air conditioner
units. It’s the mechanical
components that use electricity
and capacitor as the single
energy source to operate it.
The air conditioning compressor
is the ac parts that cause the air
conditioner refrigerant to flows
in a cycle.
What are the types of air
conditioning compressors?
There are five main types of air
conditioner compressors:
1. Reciprocating
2. Rotary compressor
3. Centrifugal compressor
4. screw compressors
5. Scroll compressors
All five groups of air conditioner
compressors work the same
way, but their internal methods
of compressing refrigerant
vapors are different.
The most common compressor is
the reciprocating compressor. It
comes into two domes or
housing:
1. Open compressors
2. Hermetic compressors
Hermetic compressor is the most
common air conditioner
compressors found in residential
AC units and light commercial
units. So, the only compressor I’ll
being focusing here is hermetic
compressors.
Hermetic compressor comes into
two types:
1. Sealed or welded hermetic
compressors
2. Semi-hermetic (this compressor
has nuts and bolts holding it
together.)
Sealed hermetic compressors
Welded hermetic compressors
aka tin can or sealed hermetic
are throwaway compressors.
There is no way of get inside the
compressor, unless it ’s cut open.
There’re few companies that
open this compressor, they are
specialize this kind of works. Air
conditioner compressors
manufacture opens the sealed
hermetic compressors to
examine it. Otherwise, its a
throwaway.
In sealed hermetic compressors
the motor and crankshaft are in
vertical position. It used the
suction refrigeration from the air
conditioner evaporator to cool
the internal compressor at an
operating temperature.
The air conditioner compressors
have a safety device inside to
protect the compressor from
heating. This device is internal
overload. The air conditioning
compressor is the most
expensive AC parts in condenser
units; it ’s wise to protect the
compressor.
In a hermetic compressors
there ’re two important tubes
that welded with the hermetic
shell. These two tubes are:
1. Suction line
2. Discharge line
The suction line is the larger line
connecting to the indoor air
conditioner evaporator. The air
conditioner compressors pull the
refrigerant through the suction
line and releases it to the air
conditioner condenser through
the discharge line.
In split-central air conditioner
units, the suction is always
insulating to prevent the cool
refrigerant from absorbing
outside heat.
Semi-hermetic compressors
This is the air conditioning
compressors that have nuts and
bolts. The motor and the
compressor are inside the heavy
iron cast. This is the compressor
that can be fixed by removing
the bolts and shells that holding
it together.
There aren’t many residential
that used these types of
compressor, but you could find
in larger home and light
commercial. It can be fixed in the
field, if you have the necessary
air conditioner equipment.
Central air conditioning
compressor Video
Make sure to press the Play
button in the player controls to
watch it. Enjoy!
Central air conditioner
compressor Training Videos
made by Danfoss
How does a central air
conditioner compressor works?
The central air conditioner
compressor works by using an
electricity to energize the motor;
which it turns cause compressor
crankshaft to rotates.
Reciprocating compressors are a
piston-cylinder type of pump.
The main parts include a
cylinder, piston, connecting rod,
crankshaft, cylinder head and
valves. The operating cycle of a
reciprocating compressor is
shown below.
On the down stroke of the
piston, a low pressure area is
created between the top of the
piston, the cylinder head and the
suction line of the air
conditioning evaporator. Cold
refrigerant vapor rushes
through the suction valve inlet
and into the low pressure area.
On the up stroke, the suction
valve closes and the exhaust
(discharge) valve is forced open
with the increasing pressure. The
vapor is compressed and forced
into the discharge (high) side of
the refrigeration system.
When the piston reaches the top
of the cylinder, the discharge
valve closes, and the suction
valve opens as the piston starts
down again drawing in cold
refrigerant vapor to complete
the cycle.
Note that the connecting rod
attached between the crankshaft
and piston serves to change
rotary motion into reciprocating
(back and forth) motion.
The piston rings prevent the
vapor from escaping between
the piston and cylinder walls and
improve the operating
efficiency.
The compressor housing or
crankcase contains the bearing
surfaces for the crankshaft and
stores the oil that lubricates the
compressor parts.
The process of the air
conditioning compressors are
showed between points 1 and 2
on the PH chart.
In split- central air conditioner
units, the compressor is located
outside within the condenser
units. It ’s a vapor pump!
Compressors produce a pressure
different between the low side
(suction pressure) and high sides
(discharge pressure) of the
refrigeration system.
This is achieved by pulling of
low pressure, low temperature,
superheated refrigerant vapor
from the suction (evaporator)
side.
It pulls the correct amount of
refrigerant to fill the volume. The
refrigerant goes through the
compressor, after it crosses the
compressor it then creates a
high temperature, high pressure
superheated refrigerant vapor to
the high pressure side (air
conditioner condenser side).
The compression of the vapor
causes the transfer of heat
energy to flows from the low
side to the high side of the
system.
As the air conditioning
compressors compression the
refrigerant, additional heat is
added to the refrigerant. These
heats are:
1. Heat of compression
2. Mechanical friction heat
3. Compressors winding heat
4. Other suction line heat
The pressure different created
by the operation of the
compressor is responsible for
refrigerant flow through the
refrigeration cycle.
Steps On How To Post share Files or Image
1. Papano ba magshare ng FILES
A. Una pumunta sa FREE FILE HOSTING para makapag upload ng files.. Halimbawa filecargo, rapidshare at marami pang iba.
step1 browse file

step2 store/ upload file

step3 Pagkatapos ma-upload ang file, copy downloadlink

step4 paste downloadlink

step5

step6
Rename downloadlink para masmalinis tignan

Ganito na ung kalalabasan ng post...

2. Papano mag share ng image..
a. Gumawa ng account sa photobucket at pagkatapos
step1 browse image

step2 upload image

step3 Pagkatapos ma-upload, copy image code

step4 paste image code

Ganito na ang kalalabasan ng post Halimbawa lang..

A. Una pumunta sa FREE FILE HOSTING para makapag upload ng files.. Halimbawa filecargo, rapidshare at marami pang iba.
step1 browse file
step2 store/ upload file
step3 Pagkatapos ma-upload ang file, copy downloadlink
step4 paste downloadlink
step5
step6
Rename downloadlink para masmalinis tignan
Ganito na ung kalalabasan ng post...
2. Papano mag share ng image..
a. Gumawa ng account sa photobucket at pagkatapos
step1 browse image
step2 upload image
step3 Pagkatapos ma-upload, copy image code
step4 paste image code
Ganito na ang kalalabasan ng post Halimbawa lang..
Monday, December 6, 2010
Recipe Site
ito ay mga recipe sa pagluluto.
Best ito
http://pinoyfoodblog.com/
http://www.myfilipinorecipes.com
http://stepbysteprecipe.com
http://pinoyfoodblog.com
http://visualrecipes.com
http://www.filipinorecipe-tv.com
http://www.allfavoriterecipe.com
http://cookingngina.info
http://www.recipephillippines.com
http://www.filipinofoodrecipes.net
http://www.myfilipinorecipes.com/meat/
http://stepbysteprecipe.com/?cat=1133
http://visualrecipes.com/recipe-details/recipe_id/513/Filipino-BBQ/
http://www.allfavoriterecipe.com/
http://www.filipinofoodrecipes.net/sinigang.htm
http://kumain.com/category/vegetables-recipes/
Wednesday, June 30, 2010
Sirang USB Flash Drive, Ayusin natin.
details of selected device kailangan lahat yung VID, PID, Cip vendor & Part Number, and Part Vendor and Model
or better yet, take a screenshot like the example below,
Pakipost pati na rin brand at capacity ng USB Drive niyo para mas madaling solusyonan..
Have you experienced troubles with your USB like, Insert USB disk? or cannot format drive?
then im here to help... Paano?
First kailangan niyo itong CHIPGENIUS...
Ano ba ang CHIP Genius?
Nagamit ko po ito sa paghahanap ng solution sa problema ko dati sa USB Drive ko, Insert USB Disk siya nuon...
Ang tool po na ito ay hindi ko nagamit ko sa Pagrepair mismo ng USB kundi detect tool upang mahanap ang chip ID ng USB Drive... At tsaka nagdownload ng panglevel format para dun sa specific na USB ko...
Ito po screenshot:

[IMG]http://i814.photobucket.com/albums/zz61/basquipoks/chipgenius.jpg[/IMG]
Download niyo ito:CHIP GENIUS para madetect niyo ang Chip Vendor at Chip Part-Number...
Baka sakaling matulungan po namin kayo. Try po nating hanapan ng format tool ang USB niyo na may problema. Malay niyo magamit pa po ito para sa dagdag kita???. (Kapag hindi madisplay ang Vendor at Part Number, hindi pa po supported yan ng chip genius)
Hope this will help you....
Compilation of tools po...
Low Level Format Tool
HP Format Utility
Recuva Data Recovery Tool
ALCOR TOOL
Part 1
Part 2
Part 3
ICREATE TOOL
or
PDX Tool
PHISON TOOL
USBEST TOOL
or
USBEST TOOL2
SKYMEDI
Part 1
Part 2/font>
DR. UFD TOOL
Part 1
Part 2
Part 3
Part 4
FOR OTHER TOOLS, KINDLY VISIT http://FLASHBOOT.RU THEN SEARCH FOR CORRESPONDING TOOL, RUSSIAN SITE YAN KAYA USE GOOGLE TRANSLATE, GOOD LUCK!
or better yet, take a screenshot like the example below,
Pakipost pati na rin brand at capacity ng USB Drive niyo para mas madaling solusyonan..
Have you experienced troubles with your USB like, Insert USB disk? or cannot format drive?
then im here to help... Paano?
First kailangan niyo itong CHIPGENIUS...
Ano ba ang CHIP Genius?
Nagamit ko po ito sa paghahanap ng solution sa problema ko dati sa USB Drive ko, Insert USB Disk siya nuon...
Ang tool po na ito ay hindi ko nagamit ko sa Pagrepair mismo ng USB kundi detect tool upang mahanap ang chip ID ng USB Drive... At tsaka nagdownload ng panglevel format para dun sa specific na USB ko...
Ito po screenshot:
[IMG]http://i814.photobucket.com/albums/zz61/basquipoks/chipgenius.jpg[/IMG]
Download niyo ito:CHIP GENIUS para madetect niyo ang Chip Vendor at Chip Part-Number...
Baka sakaling matulungan po namin kayo. Try po nating hanapan ng format tool ang USB niyo na may problema. Malay niyo magamit pa po ito para sa dagdag kita???. (Kapag hindi madisplay ang Vendor at Part Number, hindi pa po supported yan ng chip genius)
Hope this will help you....
Compilation of tools po...
Low Level Format Tool
I think Universal na din ito, try niyo gamitin kapag hindi kaya ng tool na specifically for your device... Siguraduhing tama ang napiling Drive kasi baka yung hard disk niyo ang maformat niyo.. tsk tsk. Kapag nagamit niyo ito, hindi na po pwedeng irecover ang mga laman ng USB... brrr... |
HP Format Utility
pwede niyo magamit pag gusto niyo magrecover ng files sa HDD, USB, MMC... br.. |
Recuva Data Recovery Tool
ALCOR TOOL
Part 1
Part 2
Part 3
This is for: Chip Vendor: Alcor Chip Part- Number: AU6981~AU6983 |
ICREATE TOOL
or
This is for: Chip Vendor: iCreate Chip Part- Number: i5062-ZD |
PHISON TOOL
USBEST TOOL
or
USBEST TOOL2
SKYMEDI
Part 1
Part 2/font>
DR. UFD TOOL
Part 1
Part 2
Part 3
Part 4
FOR OTHER TOOLS, KINDLY VISIT http://FLASHBOOT.RU THEN SEARCH FOR CORRESPONDING TOOL, RUSSIAN SITE YAN KAYA USE GOOGLE TRANSLATE, GOOD LUCK!
Wednesday, March 3, 2010
How To Disable and Enable USBPort.
Make sure you have admin
rights.
hi here is the simply way to
block USB port try this,..................
To disable the access to USB port,
in windows XP and 2000:
1. Click Start, and then click Run.
2. In the Open box, type regedit,
and then click OK.
3. Locate, and then click the
following registry key:
HKEY_LOCAL_MACHINE\SYSTEM
\CurrentControlSet\Servic es
\UsbStor
4. In the right pane, double-click
Start.
5. In the Value data box, type 4,
click Hexadecimal (if it is not
already selected), and then click
OK.
6. Quit Registry Editor.
To re-enable a disabled port:
1. Click Start, and then click Run.
2. In the Open box, type regedit,
and then click OK.
3. Locate, and then click the
following registry key:
HKEY_LOCAL_MACHINE\SYSTEM
\CurrentControlSet\Servic es
\UsbStor
4. In the right pane, double-click
Start.
5. In the Value data box, type 3,
click Hexadecimal (if it is not
already selected), and then click
OK.
6. Quit Registry Editor.
__________________
How to create a lockedfolder in Win XP -
To create a locked folder we
need to create two batch files.
The first batchfile will “lock”
the folder (actually it will turn
the ordinary folder into a link
to the Control Panel using an
address code), and the other
one will “unlock” it. When
someone tries to access that
folder, he will be redirect to
Control Panel(we can in fact
type in any address code so that
the user could be redirected to
wherever we want). You should
hide these batch files, especially
the second one.
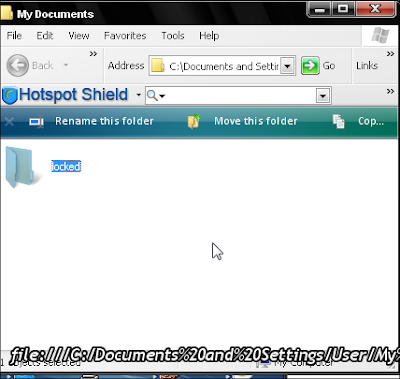
1. Create a folder, that you will
use to store your protected
data. For this example, I created
a folder called “locked”, and put
that folder in My Documents.
2. Open Notepad and copy this
code ren “FOLDERNAME”
“FOLDERNAME“.
{21EC2020-3AEA-1069-
A2DD-08002B30309D}
“FOLDERNAME” change in to
name of your folder, in this
example “FOLDERNAME” is
locked.My code looks like this ren
locked.{21EC2020-3AEA-1069-
A2DD-08002B30309D} locked
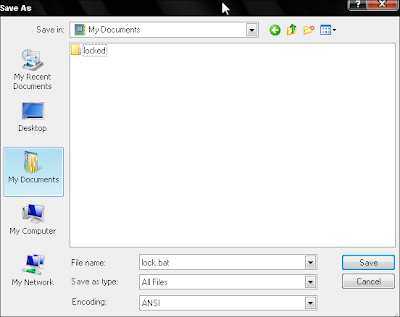
Save notepad file like lock.bat in
My Documents. In option Save as
Type, select All Files
3. Open another notepad file and
copy this code ren
“FOLDERNAME“.
{21EC2020-3AEA-1069-
A2DD-08002B30309D}
“FOLDERNAME” , Save file as in
Step 2, just choose a different
filename , like unlock.bat
After this we can see in My
Documents something like this:
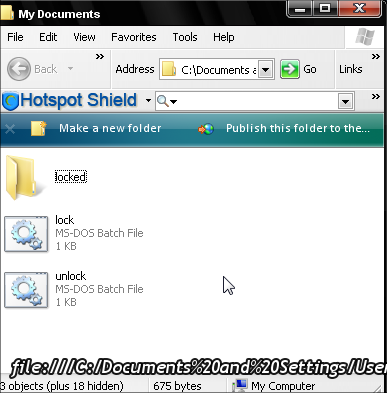
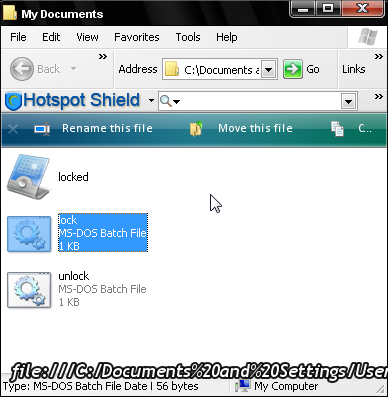
If we open (double click) lock.bat
our folder will turn into a link to
Control Panel, and the files will
not be visible. until we use
unlock.bat
REP+++++++++++++++++
We r notin bt pen in da hand of
creature!
Persian Forums
Persian
need to create two batch files.
The first batchfile will “lock”
the folder (actually it will turn
the ordinary folder into a link
to the Control Panel using an
address code), and the other
one will “unlock” it. When
someone tries to access that
folder, he will be redirect to
Control Panel(we can in fact
type in any address code so that
the user could be redirected to
wherever we want). You should
hide these batch files, especially
the second one.

1. Create a folder, that you will
use to store your protected
data. For this example, I created
a folder called “locked”, and put
that folder in My Documents.

2. Open Notepad and copy this
code ren “FOLDERNAME”
“FOLDERNAME“.
{21EC2020-3AEA-1069-
A2DD-08002B30309D}
“FOLDERNAME” change in to
name of your folder, in this
example “FOLDERNAME” is
locked.My code looks like this ren
locked.{21EC2020-3AEA-1069-
A2DD-08002B30309D} locked
Save notepad file like lock.bat in
My Documents. In option Save as
Type, select All Files
3. Open another notepad file and
copy this code ren
“FOLDERNAME“.
{21EC2020-3AEA-1069-
A2DD-08002B30309D}
“FOLDERNAME” , Save file as in
Step 2, just choose a different
filename , like unlock.bat
After this we can see in My
Documents something like this:

If we open (double click) lock.bat
our folder will turn into a link to
Control Panel, and the files will
not be visible. until we use
unlock.bat

REP+++++++++++++++++
We r notin bt pen in da hand of
creature!
Persian Forums
Persian
Hides Ur Drives/Lock UrDrives -
Open Registry (go to run
command, type “regedit” and
press enter)
then go to this key
HKEY_CURRENT_USER\Software
\Microsoft\Windows\Curre
ntVersion\Policies\Explorer
now right click in right side pane
and create DWORD Value (blue
color)
Rename it as
“NoViewOnDrive” (for locking
drive)
or
Rename it as “NoDrives” (for
Hiding drive)
double click on it and put some
numbers to lock ur desired Drive
and click ok.
DRIVE NOS.
FOR A : 1
FOR C : 4
FOR D : 8
FOR E: 16
FOR F: 32
FOR G: 64
FOR H:128
finally restart or log-off the
computer to take effect.
Keep in mind that “0″ is Default
Value to Disable or remove this
setting..
After locking the drive when u
try to open it, u will see a
msgbox like this
“This operation has been
cancelled due to restrictions in
effect on this computer. Please
contact your system
administrator”
Subscribe to:
Posts (Atom)